I started cleaning out the interior today. Floor pans are a little worse than they look from the bottom. (Some holes just aren’t visible when they’re covered by that tar board.) I was first thinking that a half-pan replacement near the battery would be all that was needed, but it’s obvious that both full pans will need to be replaced. Not that big a set-back. Other areas, happily, are rust-free. Like the luggage compartment, for example. The interior is not too bad, overall. Front seats need to be cleaned, back seat needs some filling replaced, and a little bit of sewing, but it should be ok. Replacement of the upholstery may be an option down the road but for now I can get by with what’s there. Rubber mats may clean up ok; the front mat is torn in half, but it may not even been noticeable when put back clean. The carpet is going to be replaced. There was never a floor-carpet, only some trim pieces around the upper edges of the interior and the luggage compartment behind the back seat. Mats and carpet will not be too expensive.
Work time: One hour. Photos following:
Glovebox is dirty, and the paper/fibre box has been weakend from age and moisture.
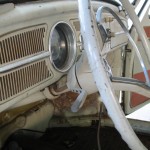
Speedo. 87252. Wonder if it’s 187k or 287k or 387k. Not even sure if it works.
Here is some interesting pencil graffiti on the dash. Mileage and Year, perhaps?
Saw a tutorial on the ‘net about repairing those little cracks in a steering wheel. May be a future project.
View from the luggage compartment.
Passenger-side rear quarter panel. Dirty, but looks solid.
The pop-out window mechanism on the passenger side is installed too far back. Indicates that the pop-outs were not factory-installed?
Driver-side rear quarter panel. Impact damage is going to be hard to get to.
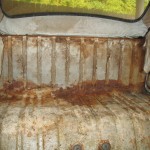
Luggage compartment/rear seat area. Looks fine.
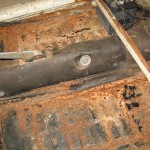
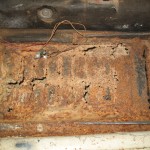
Rusty floor pans. Gotta go.
Good condition here.
Tarboard removed. Some holes.
Luggage compartment
Luggage Compartment
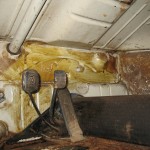
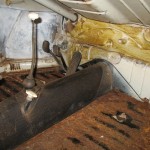
Under the rear seat.
Floor pan rust. Gotta go…
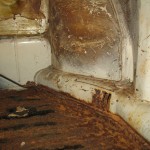
Instide the passenger-side A-pillar. near the door jamb.
Outside the passenger-side A-pillar. Problem for me.
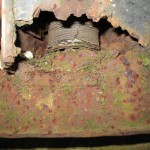
Scary rust-area. Passenger-side heater vent along the floor. This is the bottom of the A-post. The rest of the heater channel looks ok.
Ammo. Pulled from glovebox and put, of course, into an ‘evidence bag’.
I’m trying to bag-up all the small stuff as I dis-assemble the car. I think of these as “evidence bags”
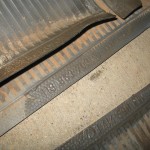
Rubber floor mat parts numbers. Helpful when re-ordering.
Passenger footrest has a rusty bottom.
Original (I assume) carpet color.
Original (I assume) rubber floor mats.
Impact damage behind driver door.
Found the missing engine-compartment hose under all the crud and rust.
Three of the four interior panels look ok, and re-usable. But the back of driver side door panel is broken and flimsy. I think the vinyl could be cleaned, and would probably still have some life in it.
Back of driver-side door panel. Interesting that it’s marked “67”. Was this a replacement panel? Did VW make two-tone door panels in 1967?
Front of driver-side door panel. Vinyl may still have some life in it.
The backing looks like masonite. If I can safely separate the vinyl from the backing, I think I could get a piece of masonite from Lowe’s or Home Depot and use the existing backing as a template for making a new one.
Restoration of vehicle comes down to three things, it seems: 1) Repair 2) Replace 3) Protect. You have parts to repair, or parts to replace. Then you want to protect all of the parts. The biggest enemy of an old car is rust, I think. So when I repair or replace a part, I want to make sure it’s protected and will last as long as possible. There are a number of product offerings designed to remove rust or retard the rusting process. I’m not sure it can be stopped completely. But, then again, I’m not a chemist.
I’ve looked at some of the products, and scoured over the forum postings at theSamba.com to find out what others are using and which ones seem to work best. There’s always a trade-off. You can have a great product that’s expensive but works well, or one that’s cheap but not as good, or one’s that mid-priced but involved more installation steps. I want something that will work reasonably-well, but I want to minimize the number of steps needed to use it. And I need to establish a methodology for working on the car, so that the steps I take are clearly defined depending on the repair needs of any given part. I don’t want to take the entire car down to bare metal, but some of it definitely will be. So I need a process for both painted surfaces and bare metal. Since I’m going to try to spray primer and color, I want to spray a lot of area each time and not be repeatedly mixing and cleaning paint supplies. This means there will be some parts that are prepped, and then set aside for future priming.
A couple of the heavy-hitters in the rust-protection world are POR-15 and MasterSeries by PM Industries. I have chosen to go with the MasterSeries Silver, and another product that PM Industries sells called Captain Lee’s Metal Prep. POR-15 has a lot of fans in the rust world, but the MasterSeries seemed to be more flexible and simpler in its application. MasterSeries Silver
After emailing the nice people at PM Industries, I have concocted the following workflow:
IF I GO TO THE BARE METAL
1. Use Capt. Lee’s Metal Prep, and the panel can sit for a while (months, let say.)
2. Then, when I’m close to primer time, use the MasterSeries Silver. Body filler can be used before or after this step.
3. Spray primer. (it can then sit for a while longer, if I’m not ready to paint, and the primer doesn’t have any time requirements.)
4. Color paint.
If I don’t go to bare metal, of course, start with step 3.
There are some areas like the back/inside of a chrome bumper, for example, where I can just clean it up and use MasterSeries Silver on it. If MasterSeries Silver sits for more than a week, then primer/paint has a harder time sticking to it. But if it’s not going to be painted (like the bumper back), it doesn’t matter.
I think this method will work for me. I still need information on selecting the correct primer. Don’t want one that requires painting soon after applying it. I don’t have the time to do all the repairs, then all the priming, then all the painting. Some parts will be finished and have to sit for a little while. MasterSeries is supposed to be able to work with any kind of primer/paint.
Ok. Let’s order it. Three quarts of MasterSeries Silver ($78), 1 gallon of Captain Lee’s Metal Prep ($29.95). $15 Shipping. Total — add $122.95 to the Beevis Bill ™.
The keys for Beevis are original (I think), so I want to get a new set to use. Off for my first visit to Tupelo Hardware on Main Street. This is the famous hardware store in Tupelo where Elvis Presley’s mother bought him his first guitar.
Tupelo Hardware
It’s a cool place. Elvis got his guitar here, but I couldn’t get the keys. They were out of Volkswagen blanks. Oh well, still a cool place.
Head off to Miller’s Safe & Lock for a couple of keys. Add $5.36 to the Beevis Bill.